Number of Players: 2-5
Year of Publication: 2004
Creators: Alan R Moon (designer), Cyrille Daujean (artist) and Julien Delval (artist)
She’s Got A Ticket To Ri-iiide, She’s Got A Ticket To Ri-i-iiide, She’s Got A Ticket To RIDE, And She Don’t Care!!
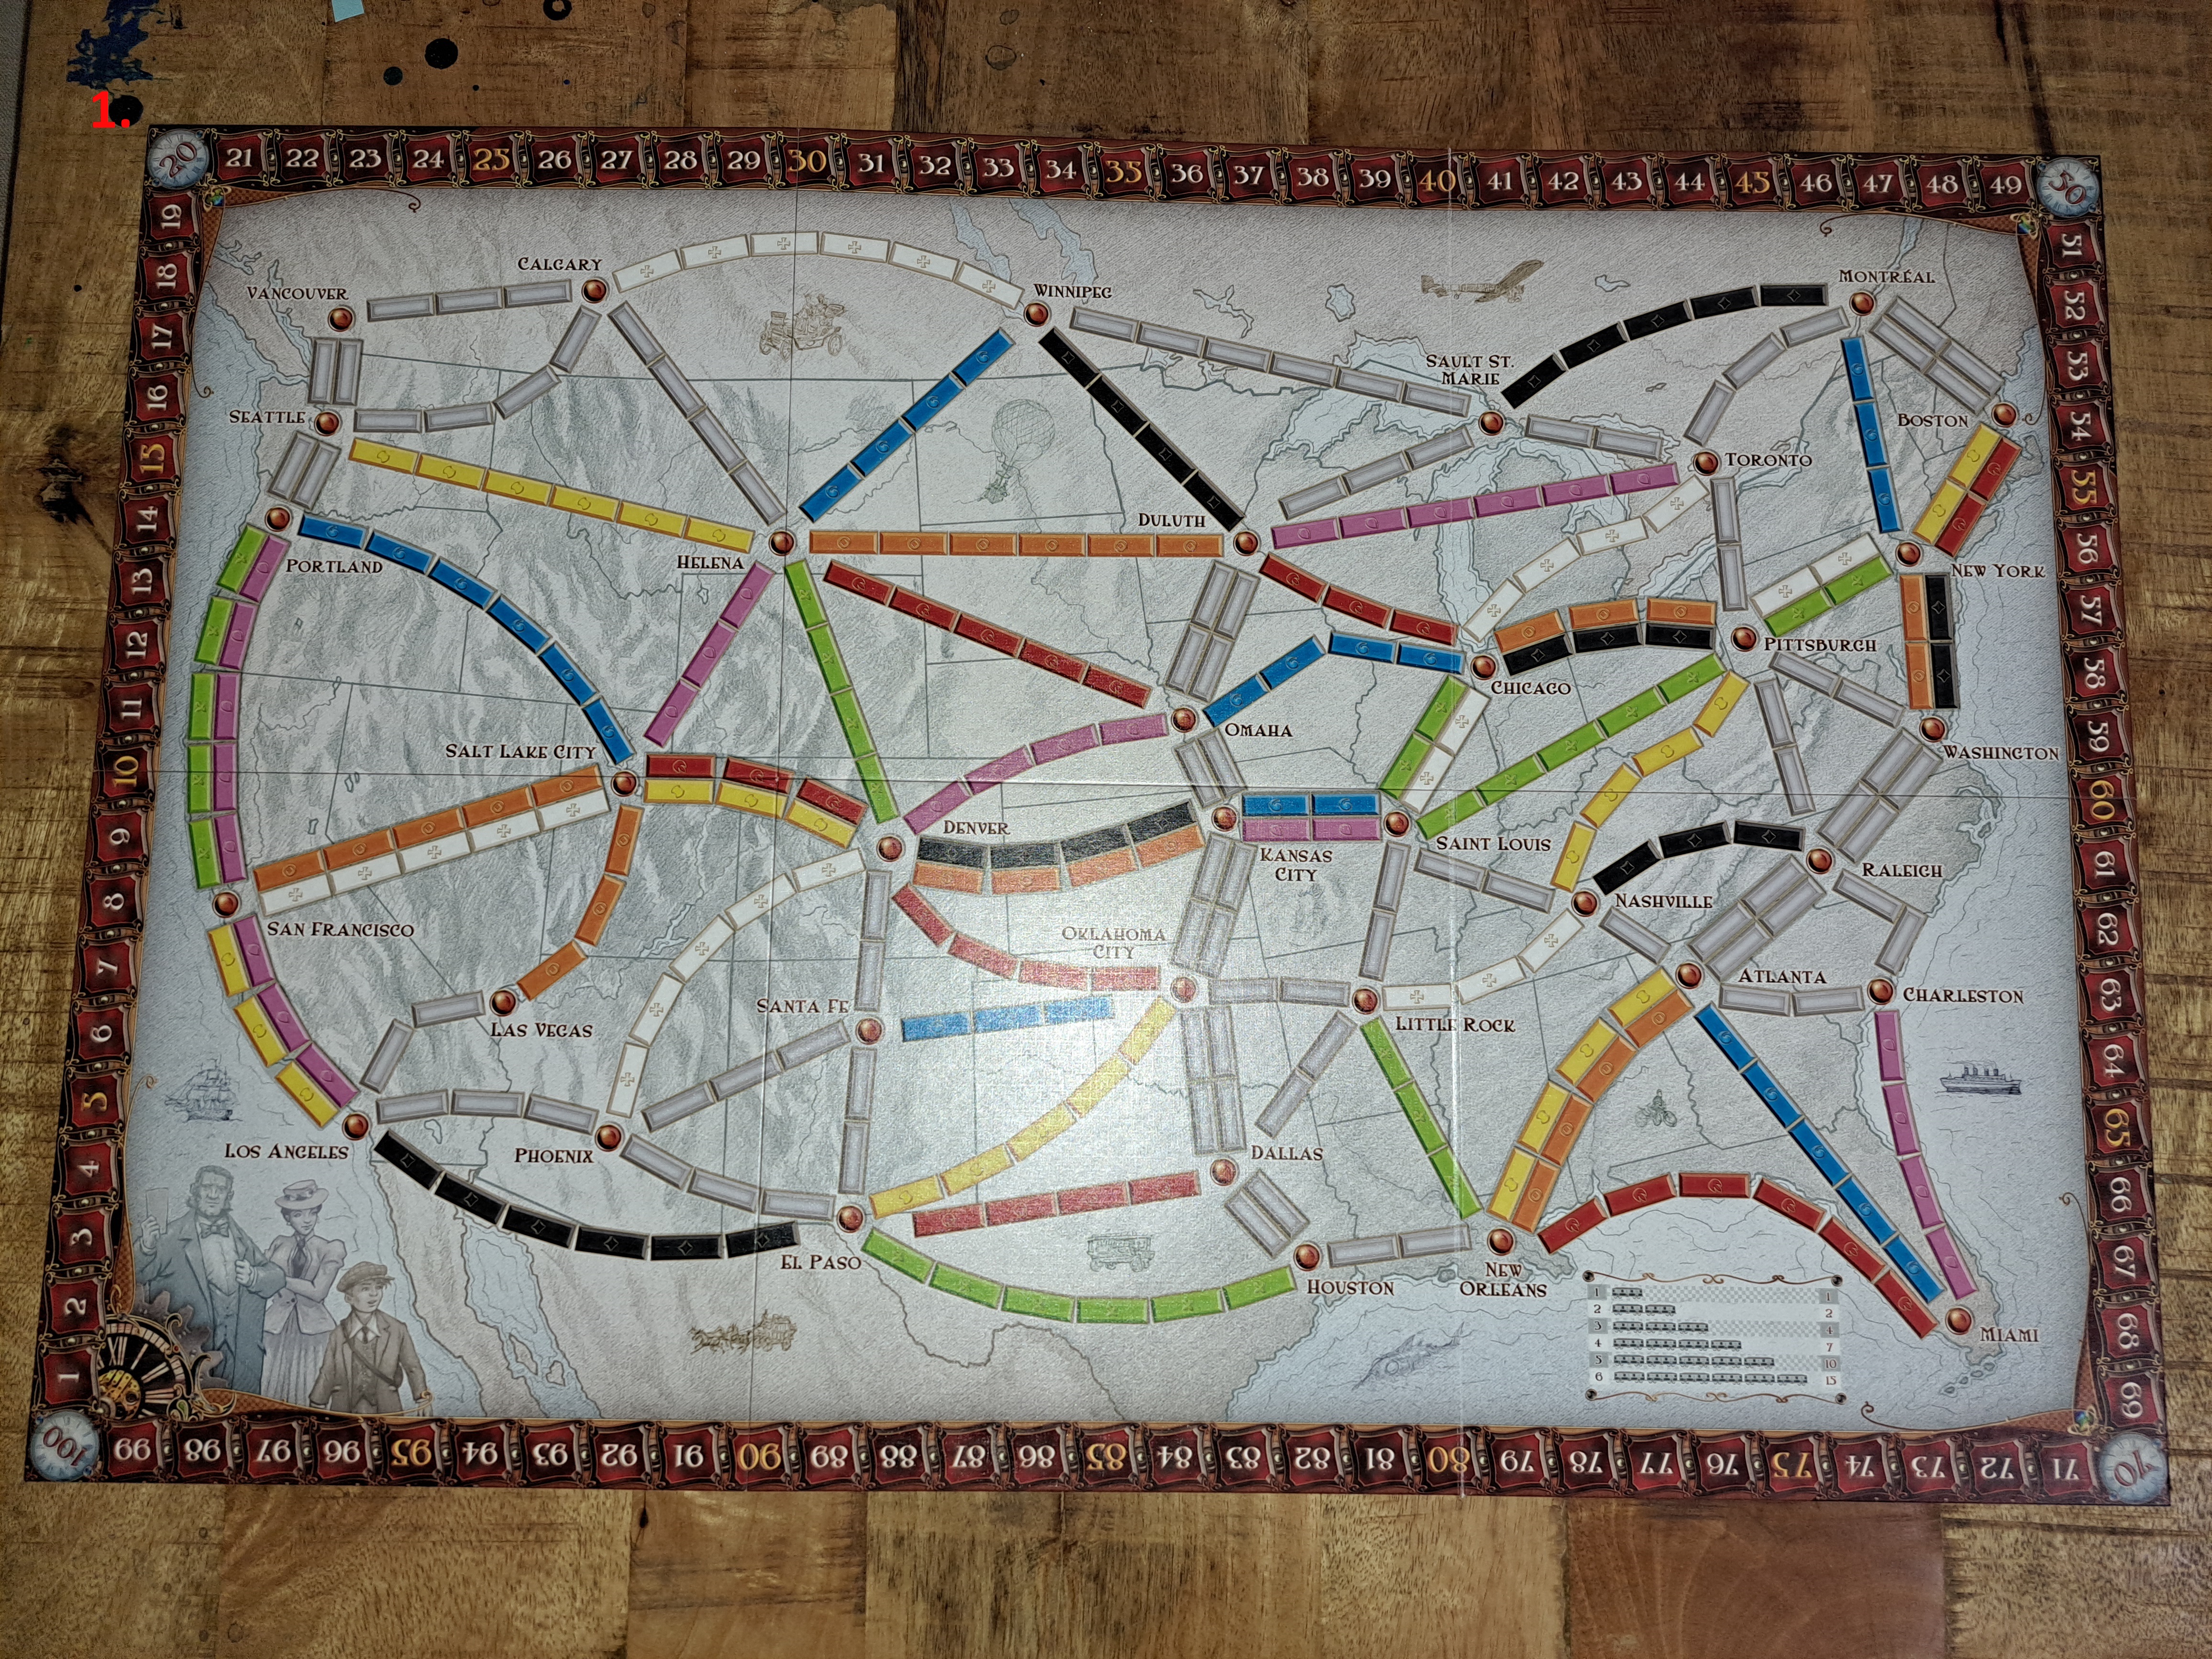
Ticket To Ride is a straightforward route-building game featuring a lovely map of North America with major cities marked on them as route destinations, all the way from Miami, down in the South-East, to Vancouver, up in the North-West, and many in between. The objective is simple: score as many points as possible before the game ends. You play as an industrial railroad builder, who is trying to forge routes across North America, each hoping to build the most lucrative routes before their rivals.
“On a blustery autumn evening five old friends met in the backroom of one of the city’s oldest and most private clubs. Each had traveled a long distance – from all corners of the world – to meet on this very specific day… October 2, 1900 – 28 years to the day that the London eccentric, Phileas Fogg accepted and then won a £20,000 bet that he could travel Around the World in 80 Days.
When the story of Fogg’s triumphant journey filled all the newspapers of the day, the five attended University together. Inspired by his impetuous gamble, and a few pints from the local pub, the group commemorated his circumnavigation with a more modest excursion and wager – a bottle of good claret to the first to make it to Le Procope in Paris.
Each succeeding year, they met to celebrate the anniversary and pay tribute to Fogg. And each year a new expedition (always more difficult) with a new wager (always more expensive) was proposed. Now at the dawn of the century it was time of a new impossible journey. The stakes $1 Million in a winner-takes-all competition. The objective: to see which of them could travel by rail to the most cities in North America – in just 7 days. The journey would begin immediately…” – excerpt from the Rulebook
What’s In The Box:
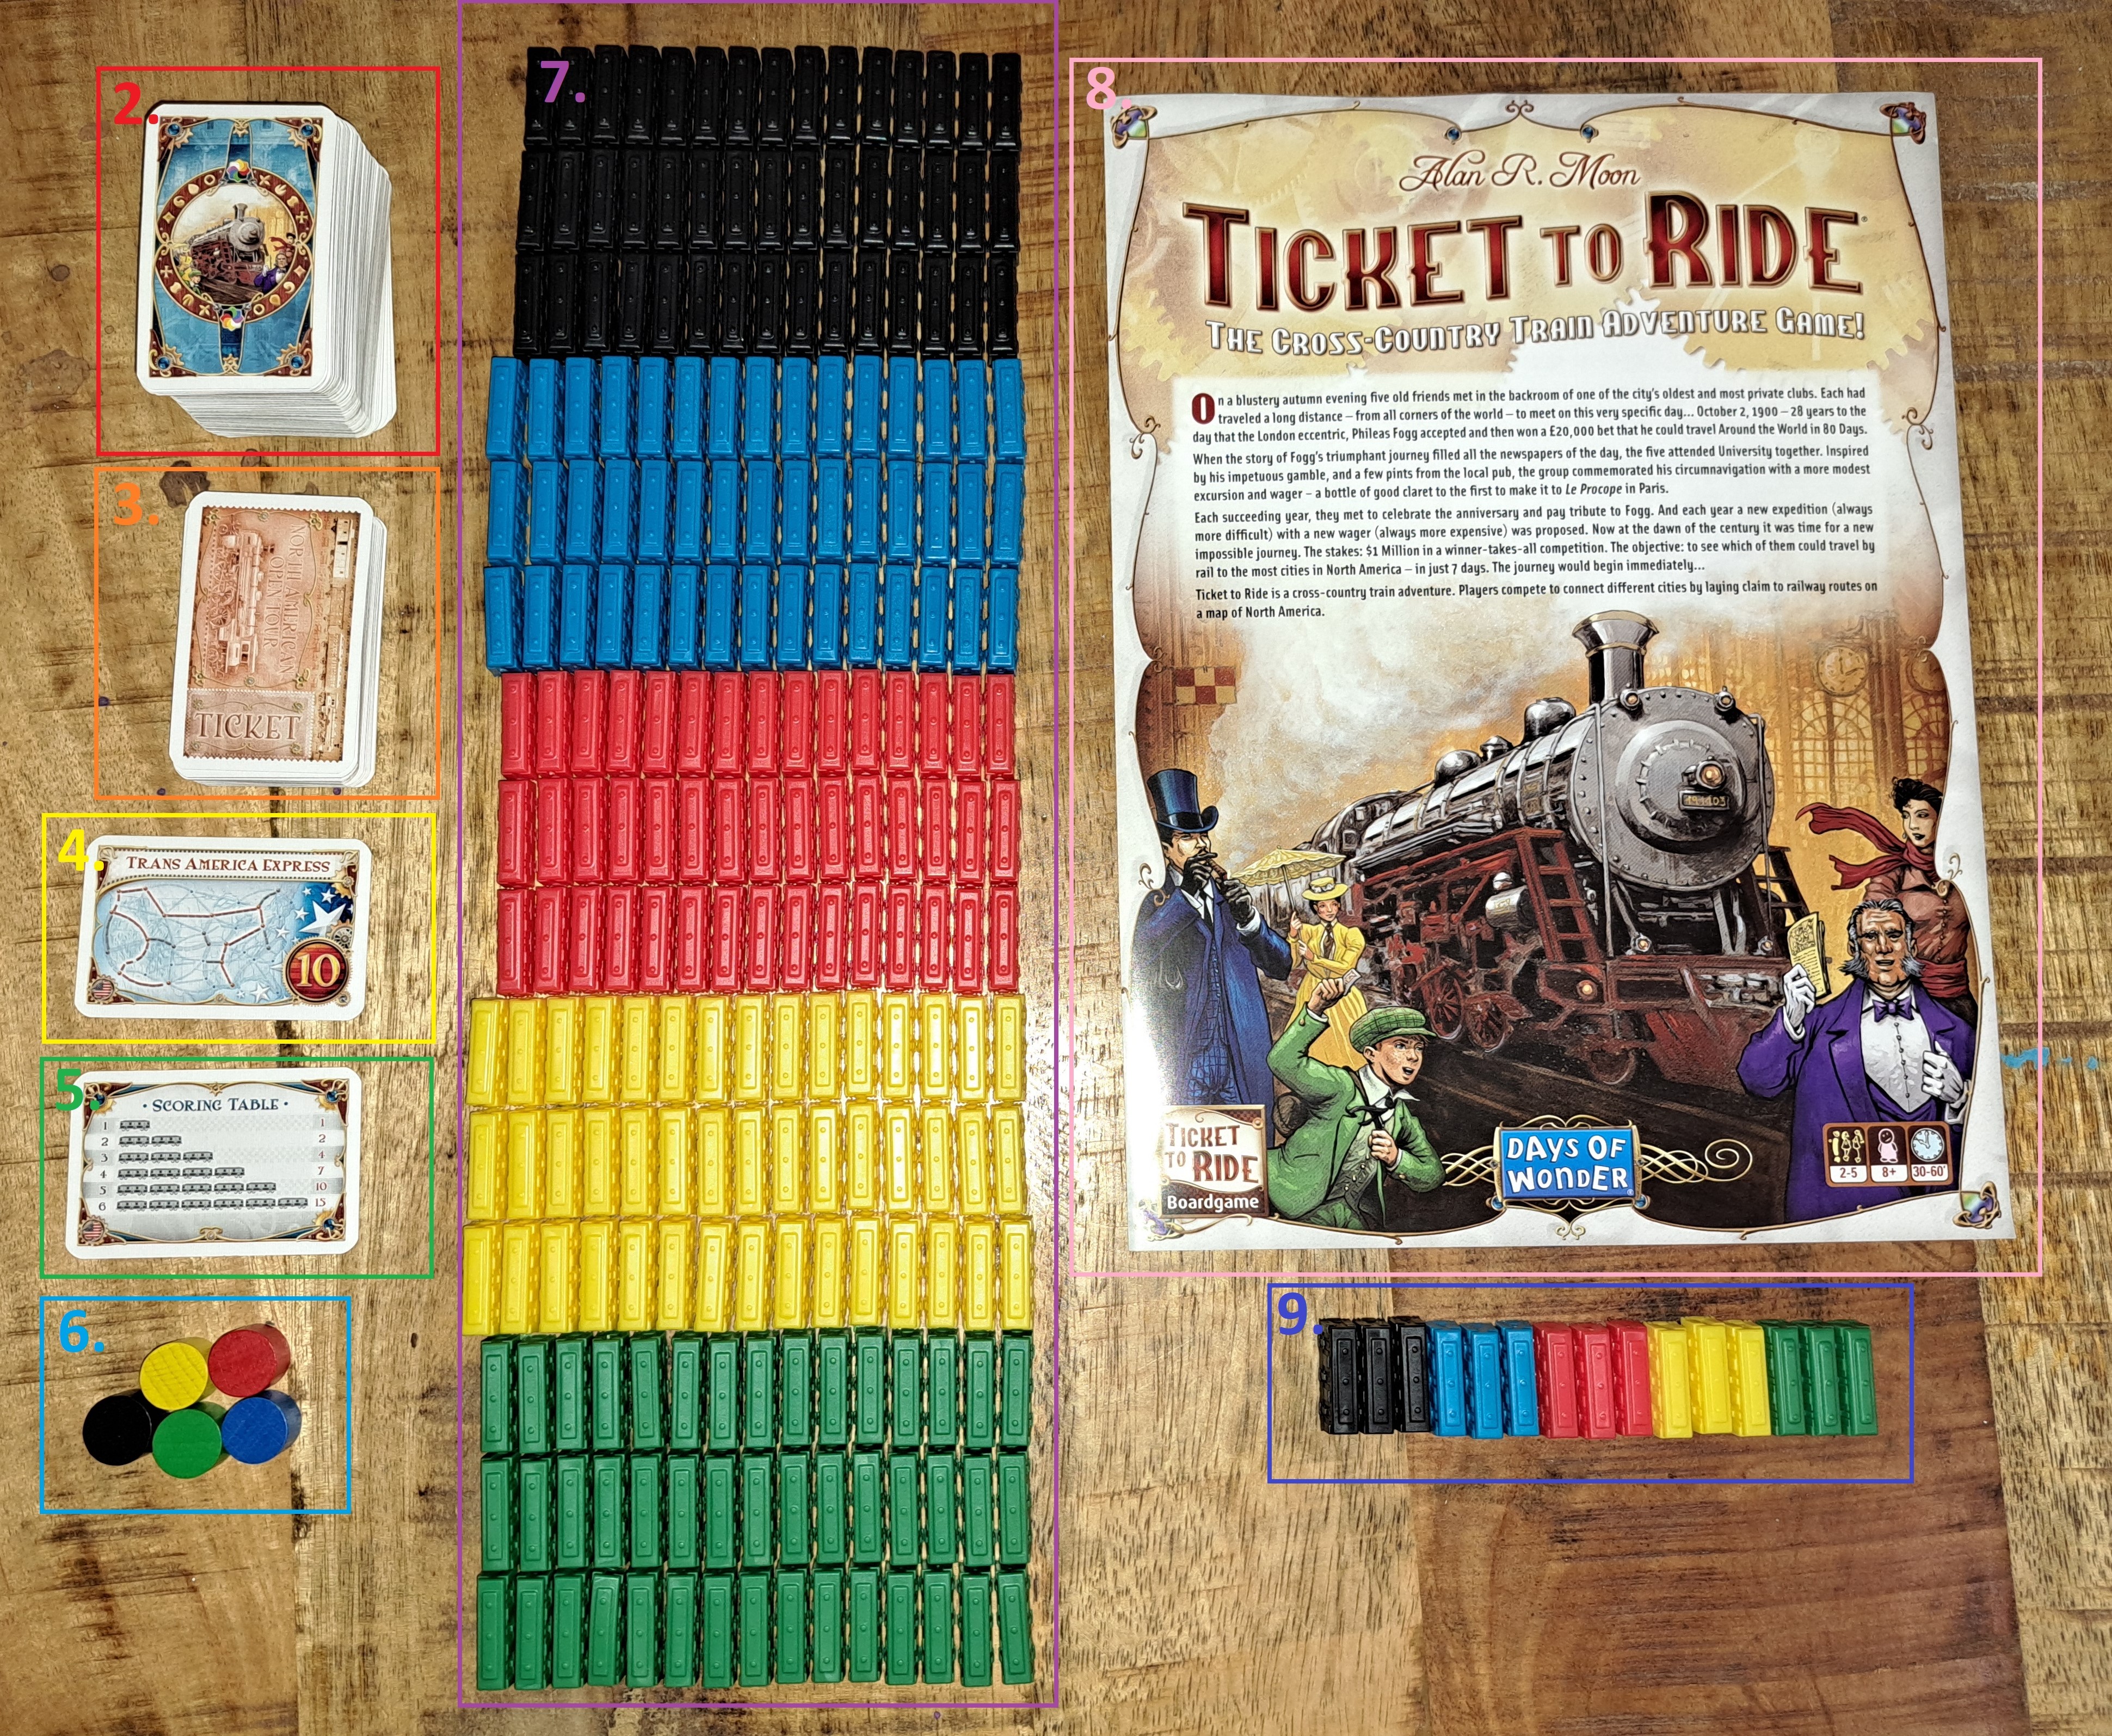
- Game Board
- 110 Train Car Cards
- 30 Destination Ticket Cards
- 1 Longest Continuous Path Bonus Card
- 1 Summary Card
- 5 Wooden Scoring Markers
- 225 Coloured Train Cars (45 of each colour)
- 1 Rules Booklet
- 15 Replacement Train Cars (3 of each colour)
Setting Up The Game:
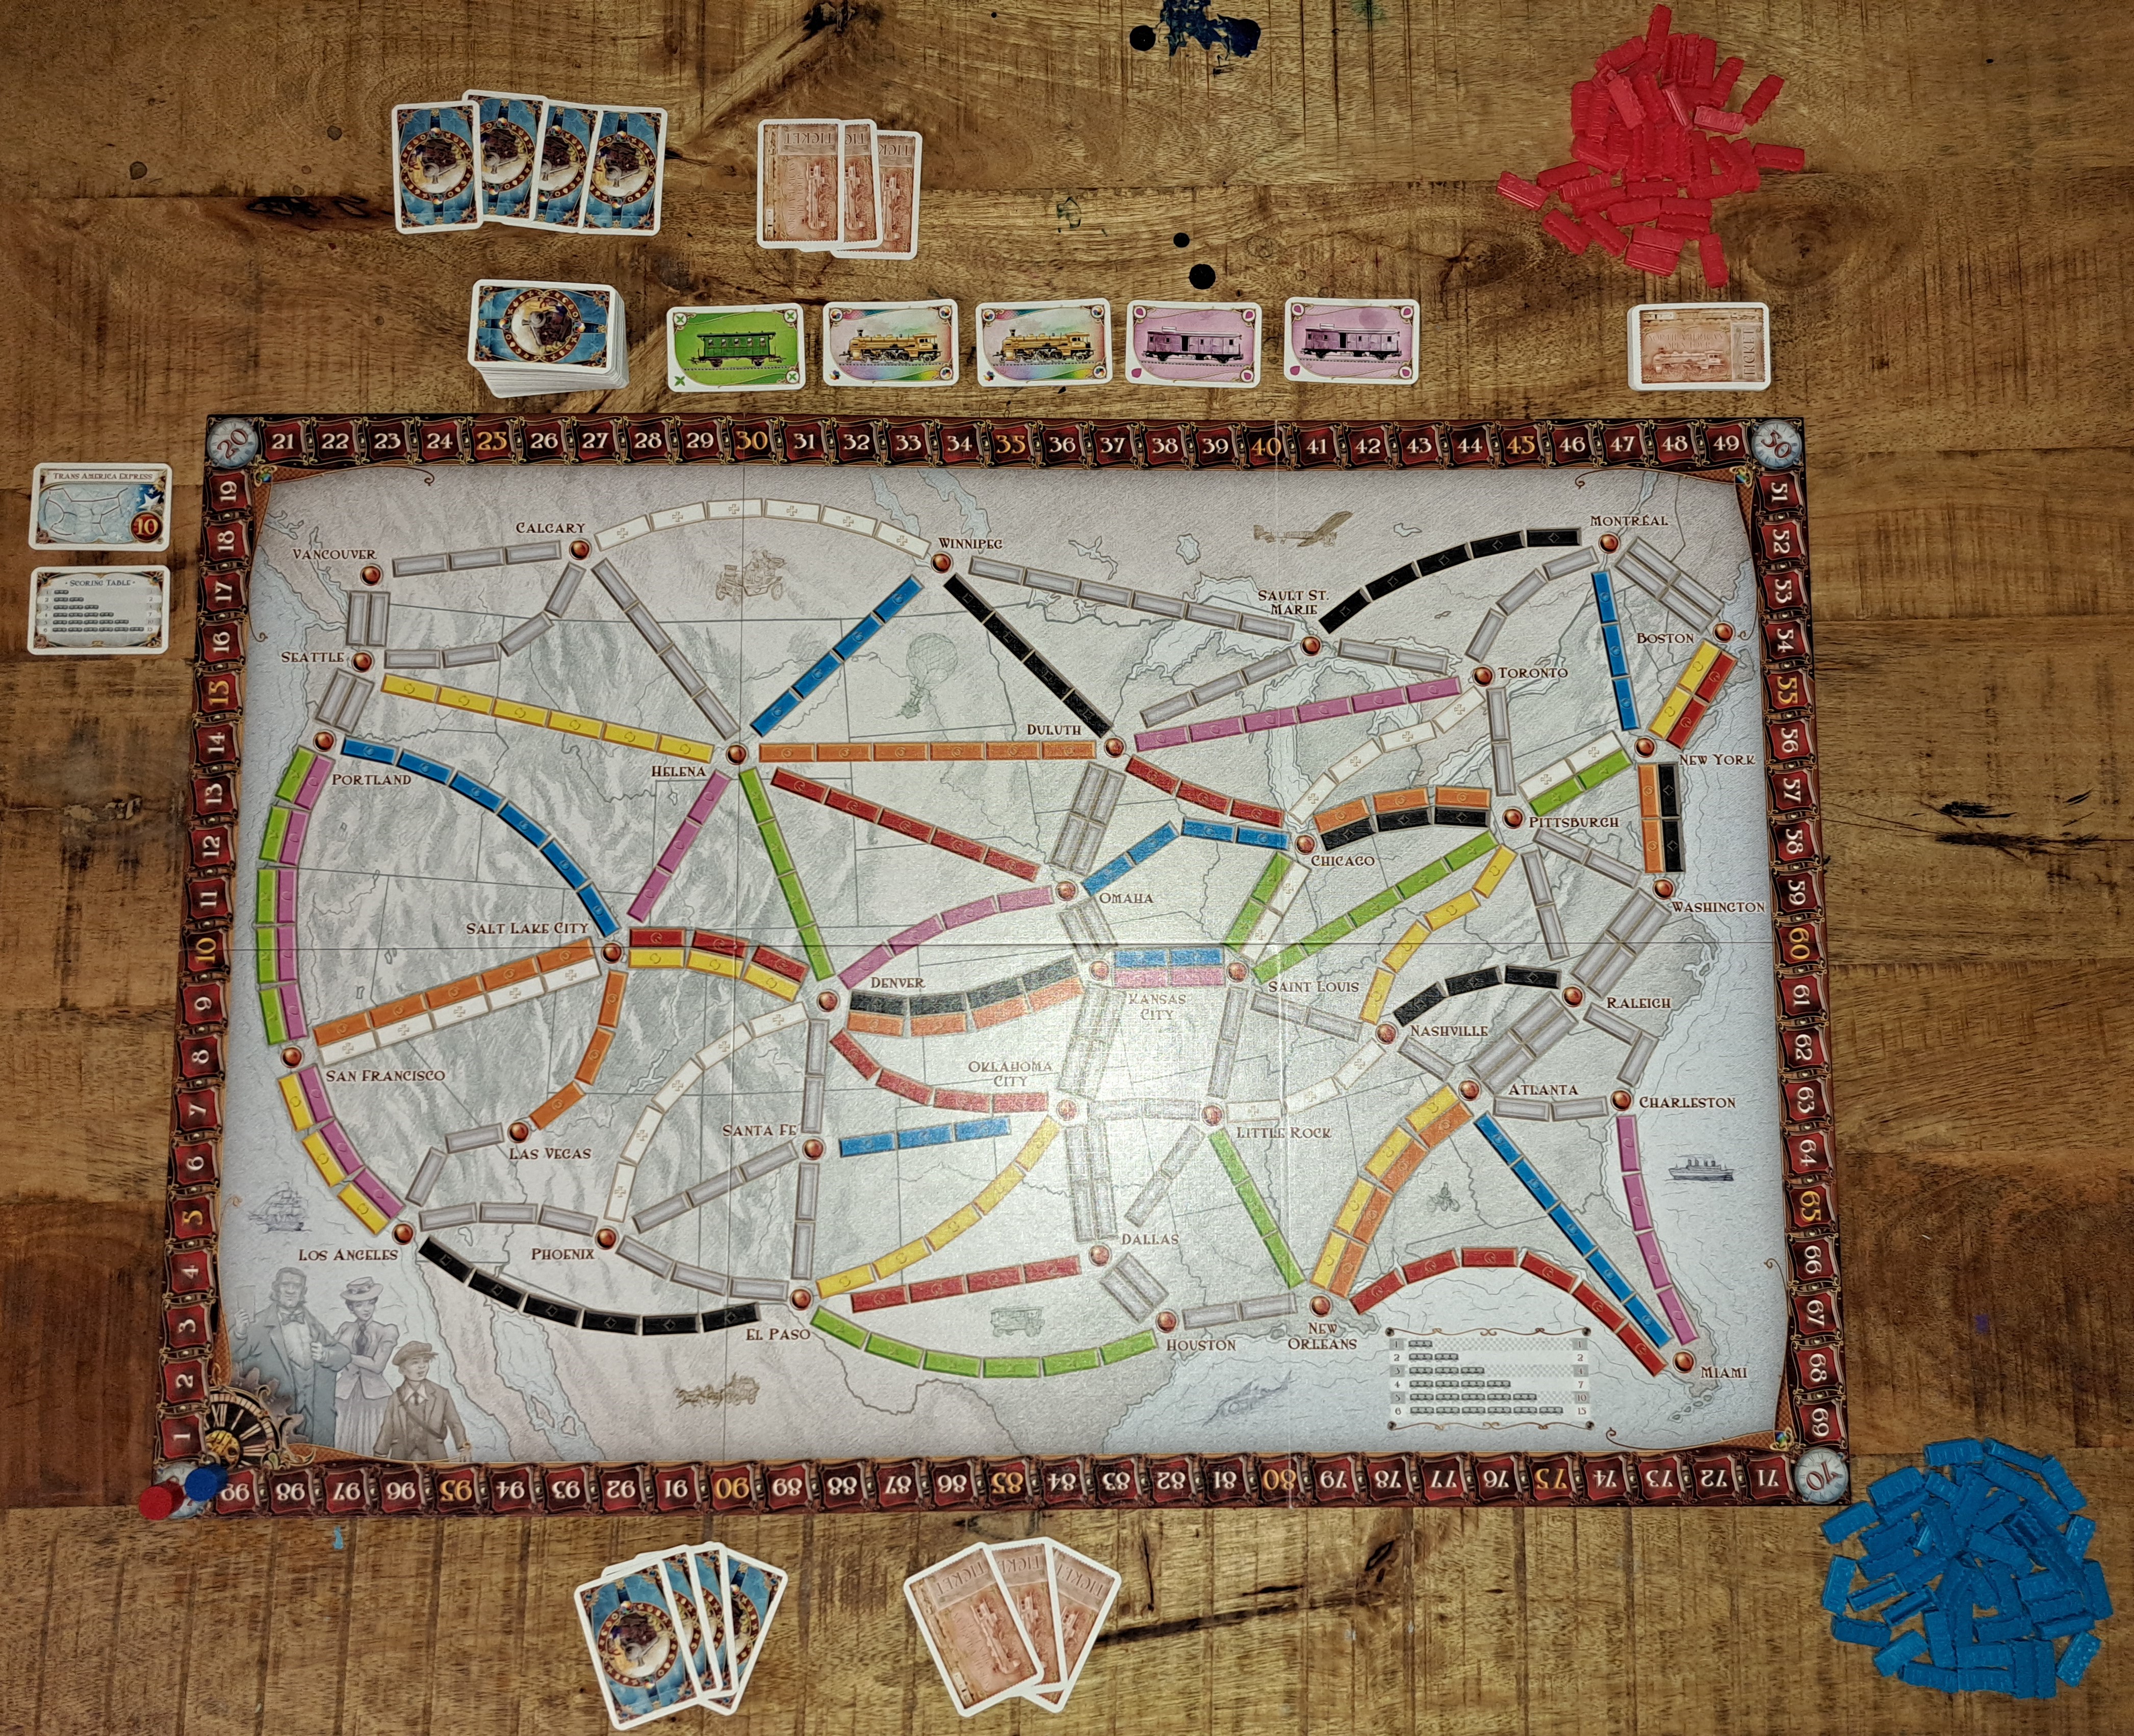
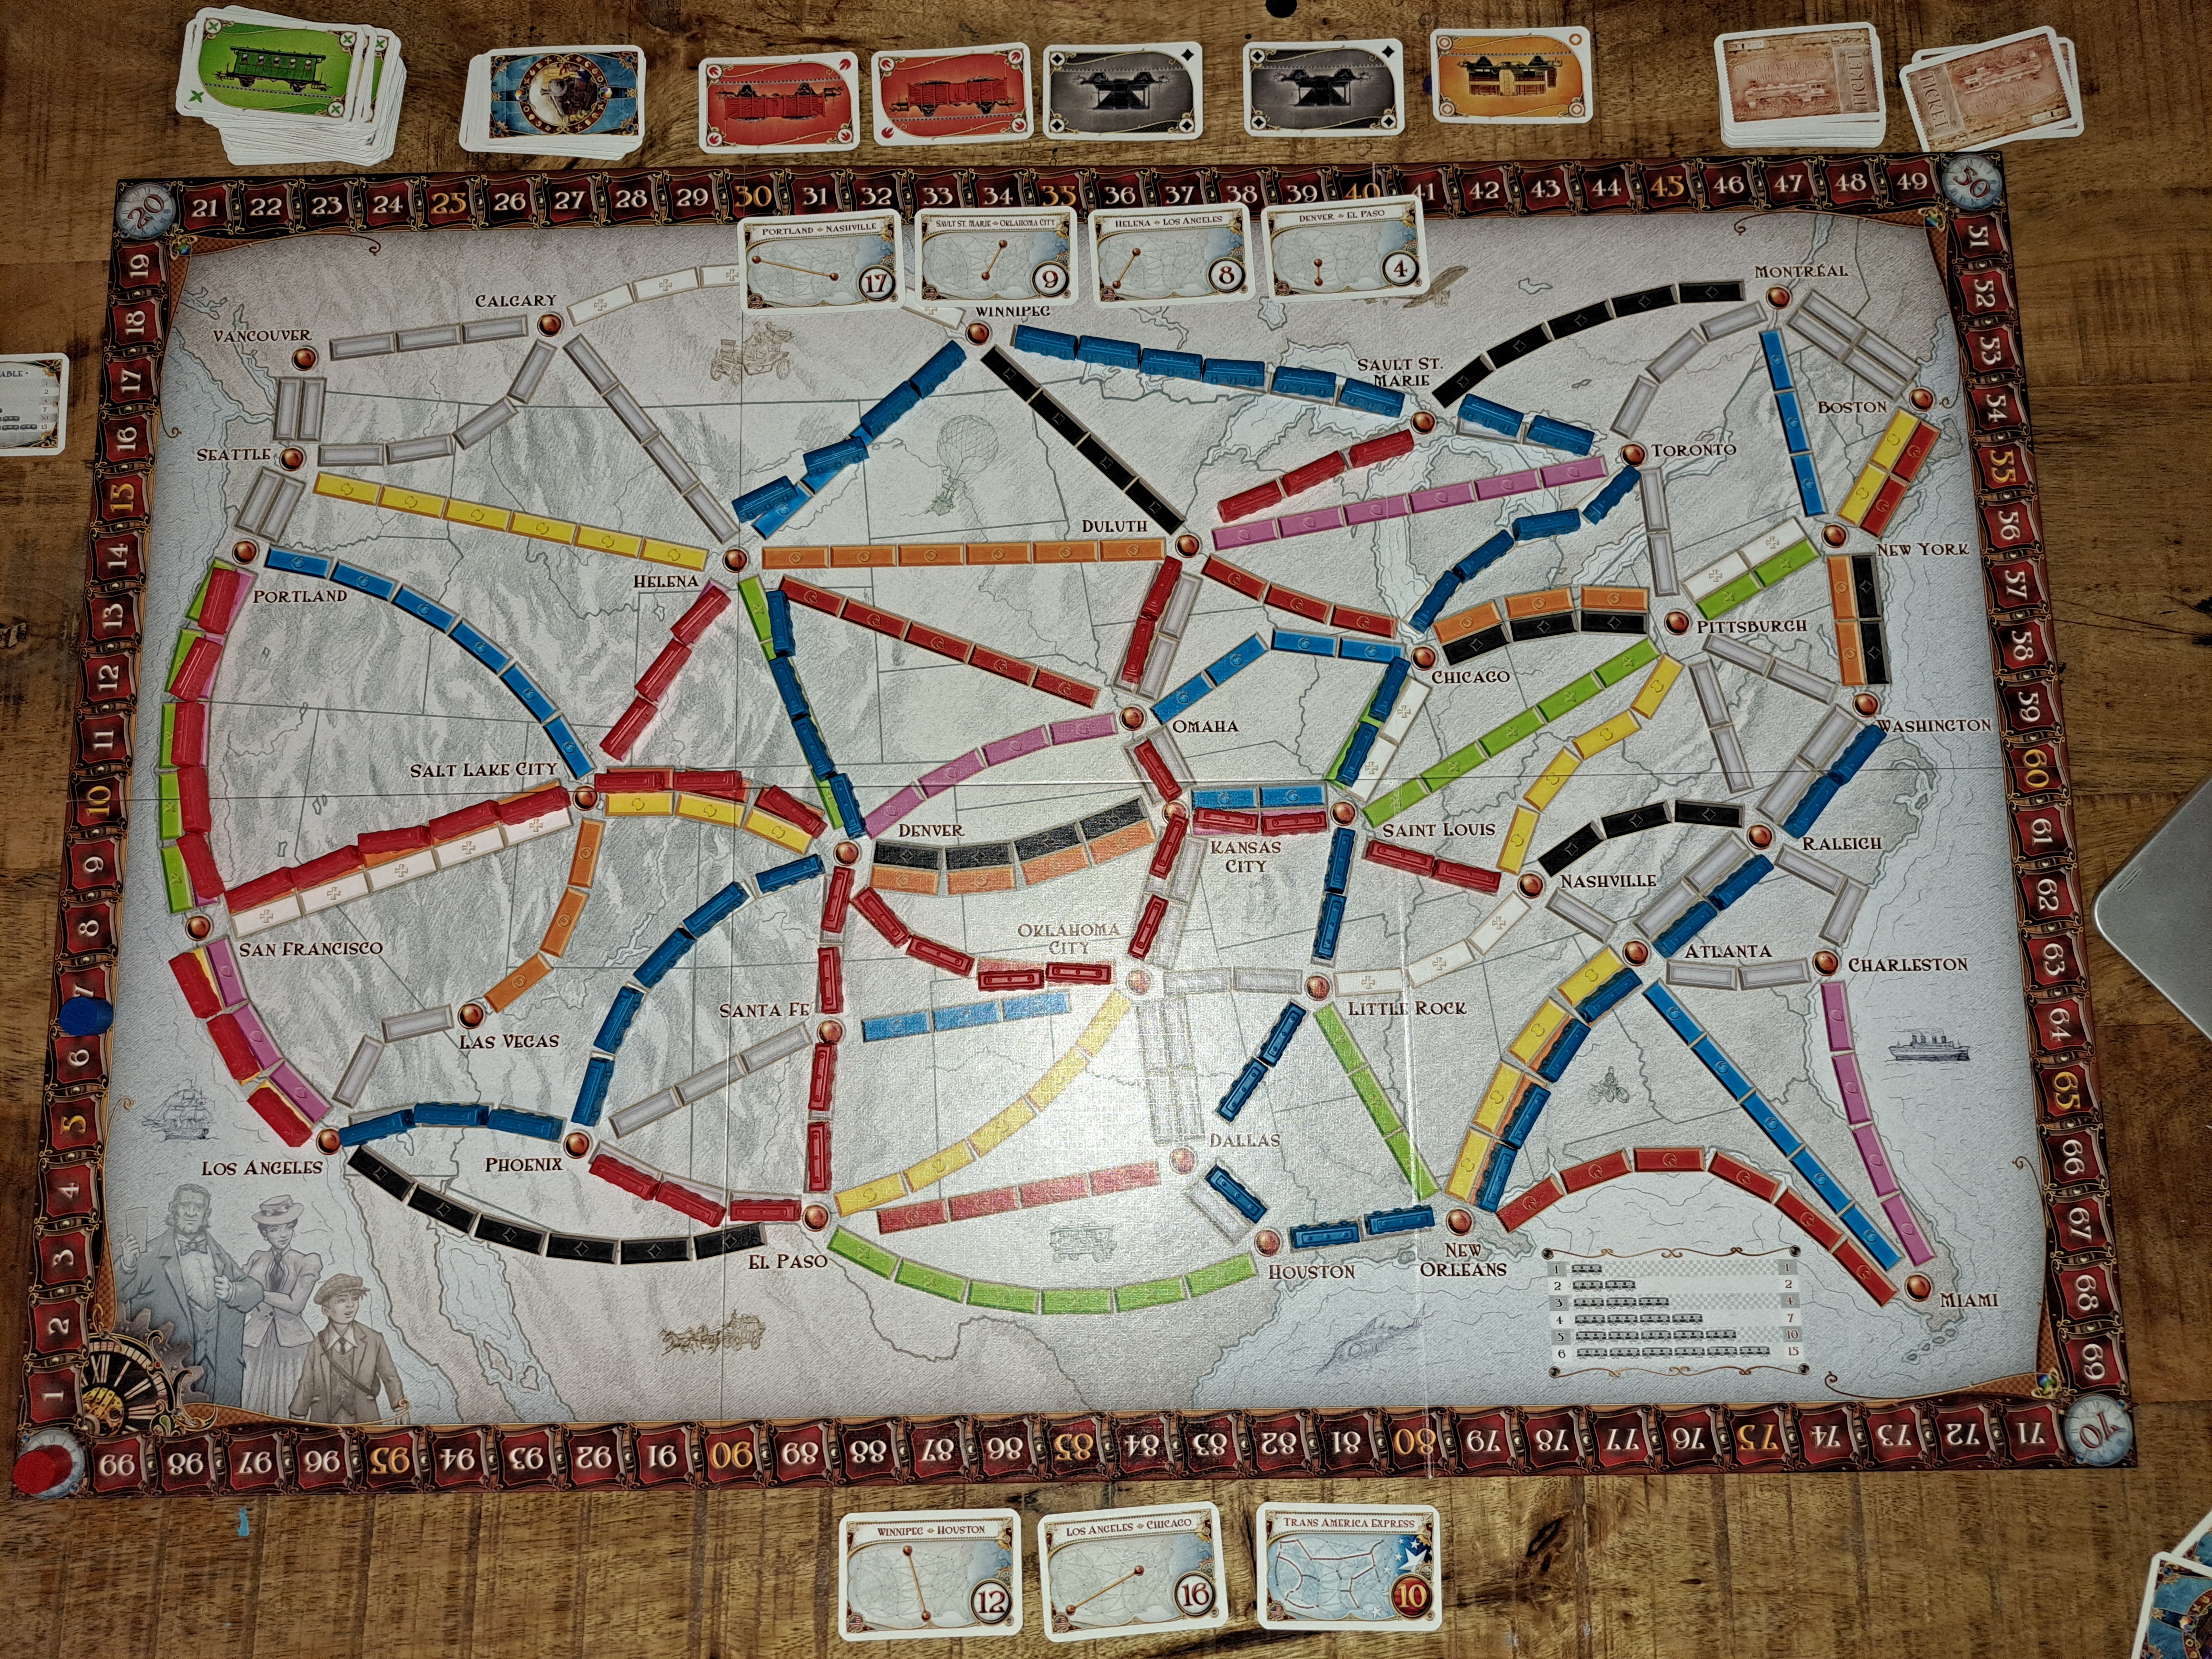
To begin place the board in the middle of a decently large table. A largish table is necessary as the board itself is pretty big and you need space for all your train cars, as well as the Train Car and Destination Ticket Cards. Each player should choose a colour and take all the appropriate Train Cars, as well as the Wooden Scoring Marker that matches. The Scoring Marker should be placed on the 100 on the scoring track, which goes around the edge of the board. The 100 also doubles as 0 for the start of the game. The Train Car Cards are shuffled, and a starting hand of four cards is dealt to each player. The remaining cards are then placed, face-down, on one of the long edges of the board and the top five are turned face up, and laid out down the edge of the board, for all players to see. Place the Longest Path Card next to the board as well. Now shuffle the Destination Ticket Cards and deal three to each player. The players may now look at them, and decide which they want to keep. All three may be kept if a player wishes, or a maximum of one can be discarded. Discarded Destination Ticket cards are placed on the bottom of the pile, which is then put at the side of the board, once each player has finished deciding. You are now ready to begin and the most experienced traveller plays first, with play continuing clockwise after they have taken their turn.
Playing The Game:
On each players turn, they may perform one of the following three actions:
- Draw Train Cards – a player may draw two cards; one either from the face-up cards lying on the table, or one from the top of the face-down pile of Train Car Cards. If they draw from the face-up cards a new card is immediately taken from the top of the face-down pile to replace it. There should always be five Train Car Cards face-up on the table. Once the first card has been drawn the player can then decide where they want to draw their second card from, as before. *See below for special rules applying to Locomotive Train Car Cards
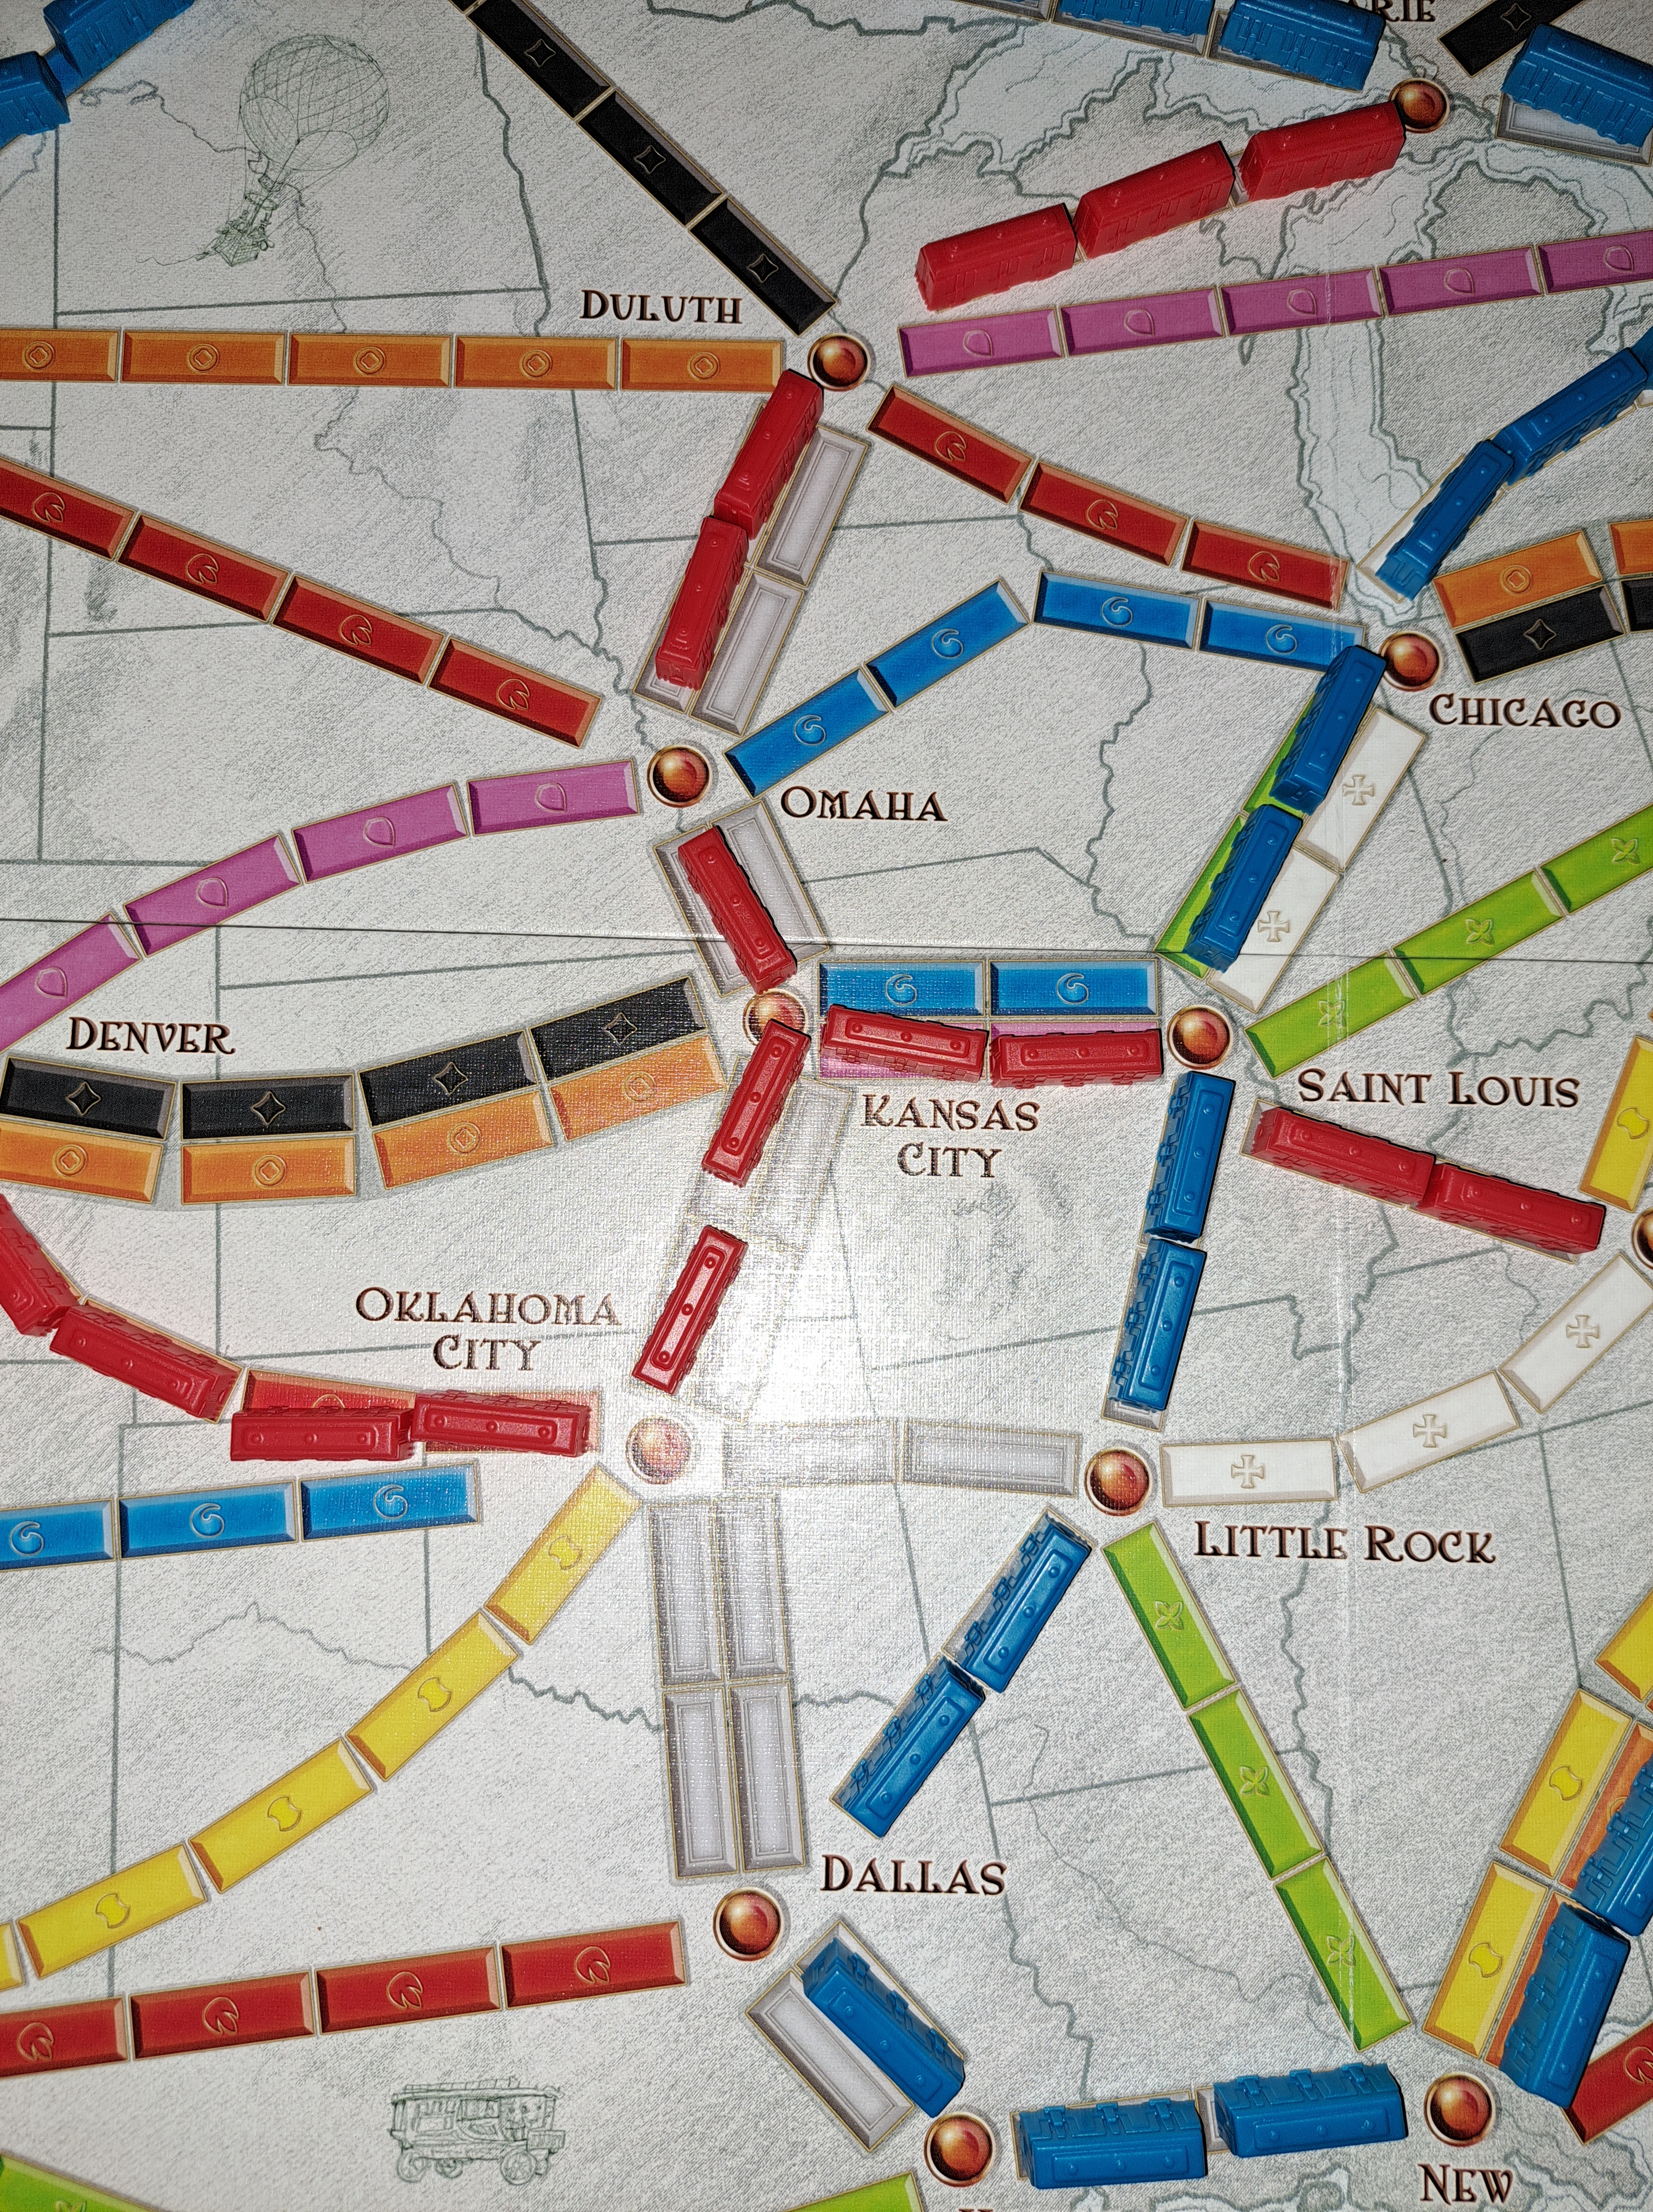
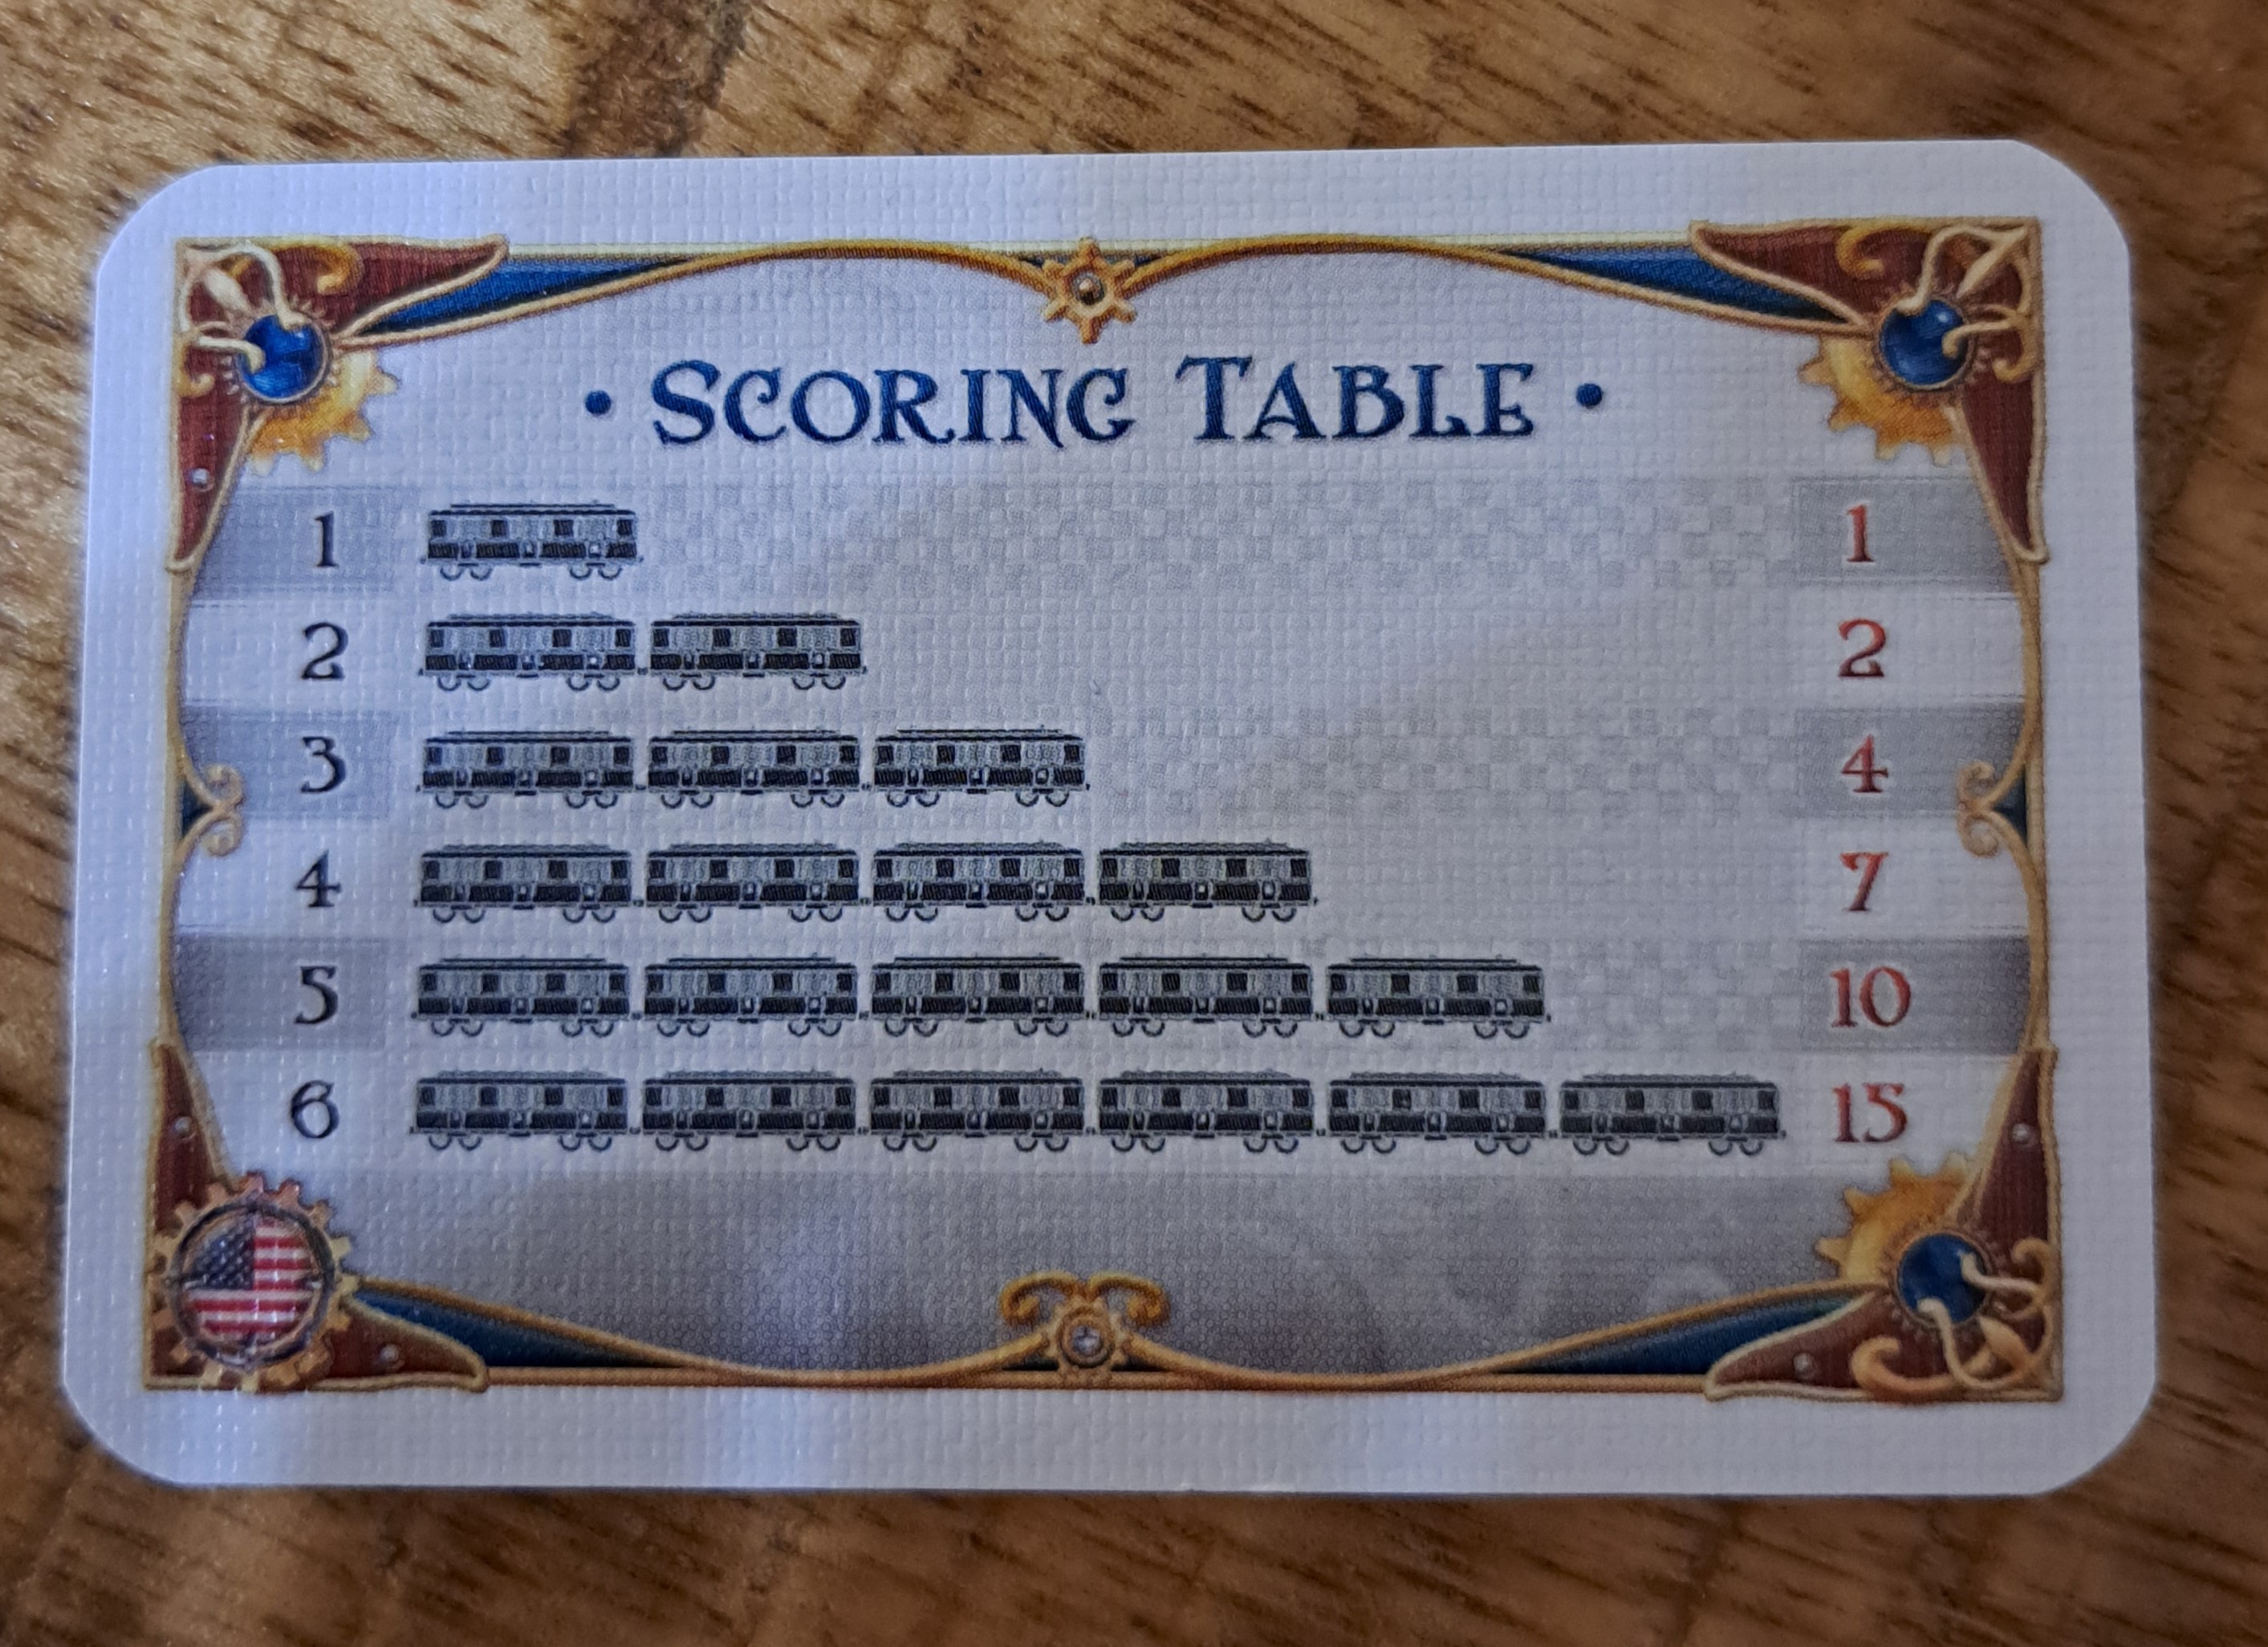
There is no limit on hand size in this game; a player may hold as many cards as they wish and continue to draw new cards. Only if the draw deck runs out will they be forced into one of the other two permitted actions. - Claim A Route – various routes are indicated across the board by small coloured rectangles connecting two cities. In order for a player to claim one they must lay down the appropriate number of cards for the route they wish to claim. Additionally, the rectangles are coloured, indicating which type of Train Car Card must be used to claim that particular route. A route can only be claimed if a player has the required number of cards all in the correct colour. If a route is comprised of grey rectangles then any colour of Train Car Cards may be used, as long as they are all the same. Once a route has been successfully claimed the player lays their Train Cars onto the route, discards the cards they used to claim it, and moves their Scoring Marker up the scoring track the appropriate number of spaces. How much each route is worth is indicated both on the board itself and on the small Summary Card. Special note regarding routes: on some sections of the board there are routes that show a double line of rectangles. This means that that route may be claimed twice during play. HOWEVER, in a two-player game, each double route may only be claimed once, in order to increase the challenge of the game a little, as there is less overall competition for routes. *Special Locomotive rules apply here too
- Draw Destination Tickets – the player draws three new Destination Tickets from the top of the deck, looks at them, and decides which they want to keep. A minimum of one must be kept, but the player may keep two or all three if they so wish. Any discarded Destination Tickets are returned to the bottom of the deck.
Special Locomotive Train Car Rules!
Locomotive Train Car Cards are easy to spot as they are multi-coloured. They act as a wild card and can be used in place of one regular Train Car Card of any colour when claiming a route. When drawing cards, if a Locomotive is one of the face-up cards on the table you may take it, HOWEVER if you do, you may NOT draw a second card. Additionally, if you draw a regular Train Car Card from the face-up five and the replacement card is a Locomotive, you MAY NOT take that card. If, however, a Locomotive is drawn blind as the first card taken from the draw deck, the player is lucky, and may still draw a second card either from the deck, or from the face-up cards.
IMPORTANT NOTE: IF AT ANY TIME THREE OF THE FIVE FACE-UP TRAIN CAR CARDS ON THE TABLE ARE LOCOMOTIVES ALL FIVE CARDS MUST IMMEDIATELY BE DISCARDED AND NEW ONES DRAWN TO REPLACE THEM.
An important thing to know regarding Destination Tickets is that they each have a point value. If the route indicated is completed by the player holding the card before the game ends, those points are added to their final score when the game has ended. If the route HAS NOT BEEN COMPLETED the player loses those points at the end instead. Destination Tickets are kept secret until the end of the game and the points from them are added only once play has finished, no matter when a player completed the route. As with hand size, there is no limit to the number of Destination Tickets a player may hold.
Ending The Game:
The game ends when one players supply of trains is either 0,1 or 2 at the end of their turn. After this each player, including the player who triggered the end of the game, may take one more turn before final scoring is done.
Strategy:
There is a limited amount of strategy that can be employed in a game as simple (relatively speaking) as this. We have found that completing routes, and often going for the Longest Continuous Path Bonus makes a large difference in final scoring. No matter how many individual routes a player has claimed they will most likely always be bested by someone who has one or two Destination Ticket routes completed. Especially as a few of these are rather high-scoring. It’s also worthwhile to claim routes as soon as you have the cards rather than waiting to hoard up more cards, as whilst you’re collecting cards there’s always a chance another player will steal away the route you had your eye on. If you’re approaching the end of the game and you’ve completed all your Destination Ticket routes and aren’t feeling brave enough to draw new ones, it’s worth it to try and extend your existing routes in order to claim the Longest Continuous Path Bonus, which gives you 10 extra points at final scoring. It is likewise worthwhile to lay claim to long routes, even if they do not connect you to anything particular, as these give you a good point-boost too.
To Conclude:
This is a lovely game. It’s good for a wide range of ages, so appropriate for families, and straightforward enough for both beginner and advanced board-gamers. The limited amount of reading required is very handy if younger children wish to play, though if you want to keep to the rules extremely strictly then children under the age of 6 probably cannot play alone, as they won’t be able to read the city names on their Destination Tickets. When we play with children we usually play open hand with all Destination Tickets face up on the table, in order to be able to help them plan their routes. It’s also a very nice choice if you want a relatively quick round of something, as each players’ turn doesn’t usually take more than a minute or two, and the game naturally progresses and ends quite speedily.
I personally like this game for several reasons:
- Aesthetics – the board map is really nice to look at. City names are easy to read and the colours are bright, but not garish. The design is good. Playing pieces are also sturdy and simple, therefore unlikely to break.
- Simplicity – the rulebook is a mere four sides, with plenty of pictures to explain, making it extremely easy to understand, and leaving little room for ambiguity or misunderstandings during gameplay.
- Speed – my children often like to play board games, but their current ages mean that committing to a game can be a big deal, due to short attention spans. This game is fast enough that we can usually get through a round before anarchy descends.
I have rated this only a 3.5 though because, although the game is well thought-out, attractive and easy, I like a bit more challenge to my games. However, we have a later version of the game, Ticket To Ride: Europe too, and that version expands beautifully on the originally, introducing some new rules and one new game piece, which will likely, when we come to reviewing it, bump up the rating to a 4 or 5.